Seven Top Tips for Making Your First Online Video.

So you have just been tasked with making an online video or you have decided that now is the time to embrace the fact that most social media platforms favour video  . . . . . what now?

I was delighted and quite frankly rather surprised to be invited to be a facilitator on the awesome #BYOD4L, that is Bring Your Own Device for Learning event. This is an online open learning event for students and teachers,  I was invited by @alexgspiers. Alongside Alex I joined the fantastic facilitators team of: @sheilmcn, @debbaff and @neilwithnell. Our first task was to make and post a video introducing ourselves and promoting the #BYOD4L event. This was something I hadn’t done before, eek!

Let me share my experience with you, it might just save you 6 hrs!

  1.  If you are using your phone with the screen facing you, cover the screen. I found it quite off putting looking at myself and seeing the timer as I was speaking. A tissue works well 🙂
  2.  Have a few prompts of the main points that you want to cover in your video at eye level, this saves you looking down and makes you look like a pro :). Disclaimer: I had many notes as I have a terrible memory, so er  . . . . I didn’t look like a pro.
  3. Make sure your video is landscape, after take 23 (no, not even joking!) I sent my video to @alexgspiers for feedback before posting it online. Alex dropped the bombshell that it would have been better if the video had been landscape so that there’s not a lot of dead space above my head. Why did I not think of that 😦 ?
  4. Do NOT underestimate how long this might take you to record your video! I literally started in daylight and finished in the dark, clearly i’m not a natural! You will probably be much more efficient and talented than me!
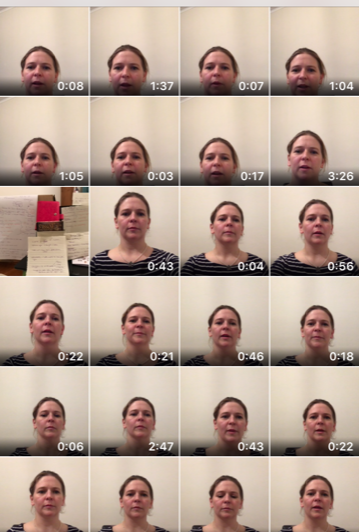
  5. Don’t give up! I succeeded after 51 takes . . . you think i’m joking? See proof below 😉
  6. Try to speak slowly and clearly, being Scottish I naturally speak quite fast. we are a nation who speak really quite quickly!
  7. Feel the fear and do it anyway. If I can do it, you can too!

If you can  . . . .try and watch the video to the end! This is my no means a perfect example, far from it. However, it met the requirements of introducing myself and the event!

Video 2 (2)

Shortest video attempt here is 8 seconds, the longest 3:04

Video (2)

In case you are wondering why I didn’t just edit a video a. I didn’t know how and I didn’t have time to learn and b. I wanted it to flow.


Thank you for taking the time to read this blog, perhaps you have some tips you’d like to share, to help newbies like me. If so please add your top tips in the comments below?


Top 10 reasons your students will thank you for using Snapchat as a tutorial tool.

snapcode

I was confident that my students liked Snapchat tutorials, this was reflected in the level of engagement in them with my 2nd and 3rd year undergraduates, studying Prosthetics and Orthotics at the University of Strathclyde in Glasgow.

Knowing they liked Snapchat tutorials wasn’t quite enough, I wanted to know why, so I asked them. Here are a few of their responses:

  1. “It’s good as you get a rapid response and the tutorials are good because you can save it and can sometimes cover things we miss when self studying of even put into practice what we have learned.” Lewis.
  2. “It’s a lot less formal so can ask a question and have a conversation about something without a well planned out question and having to structure it all.” Andy
  3. “You get a quick response.” Chloe.
  4. “Easy to access. Most have Snapchat on their phones, and can quickly ask the question and get a quick response instead of logging into MyPlace (Moodle) and searching for the specific PowerPoint.” Sarah.
  5. “You don’t just see your questions, you see everyone’s and sometimes it’s things you didn’t think about before.” Serena.
  6. “I find it to be less formal, and more comfortable to ask multiple questions compared to e-mails. ” Meghan.
  7. “Snapchat tutorial is good because I actually enjoy reading the info, and I can absorb key information on the go, without feeling as though I have to sit down and study.” Lui.
  8. “You can see if you’ve seen it which is great, as with e-mails you never know if it has been sent over.” Bhavna.
  9. “Because of a quick response, it gives the impression of a conversation and can get a better rapport with both lecturer and class mates.” Sarah
  10. “It was good when you asked us questions and we got written feedback almost right away.” Meghan.


To me, it seems the students like the less formal platform on which they can connect effectively with me, this was a recurring theme in the responses. Ease of access was also important. Our students aren’t keen on the Uni VLE MyPlace (Moodle) due to the number of steps required to get to the relevant information. With Snapchat, I am available 1 click away.  I have to say the students have not abused this, they also use the Snapchat chat group to communicate with and help each other.

The students also highlighted that they liked the quick responses and knowing that I was available to them. I would not instigate a tutorial when I was not ‘there’ to participate.

Why did I decide to start Snapchat tutorials? I wanted to explore a different way to help the students learn, to really understand the material we have covered in class. I decided to ‘meet them where they are’ and for my UG students this is Snapchat. Give it a go, be brave!

What can I help you with to get started with Snapchat tutorials, please leave comments below.


Top 5 reasons to use Snapchat as a tutorial tool with your students #BYOD4L


snapcode

Throughout the week of BYOD4L, I have mentioned my use of Snapchat as a tutorial tool with my 2nd and 3rd year students studying prosthetics and orthotics, at the University of Strathclyde in Glasgow.

This led to the invitation from a few people to write a blog about this which, to be honest, filled me with fear! I’ve decided a gentle introduction to blogging with my ‘Top 5 reasons to use Snapchat as a tutorial tool with your students’ is a good starting point. So here it is:


  1. Snapchat is where your students ‘are’, meet them there!
  2. Your students can see when you are available to Snap.
  3. Instant communication with your whole tutorial group at once.*
  4. Use the chat function and your messages will not disappear after 10 seconds.**
  5. Your students can support each other, under your supervision.


* When you reply to one student you are replying to many. Win! i’m not sure of the maximum number of students you can have in a group, I have 25. I think it might be 30?

** There are still text and accompanying images in my Snapchat groups from October! When using the Snapchat group the message does not disappear after a number of seconds as it would do using the app itself.

Please note in order for your images to remain on the chat, they need to come from your camera roll. If you take images through the app they will be visible only twice.

I will write a blog about using Snapchat as a tutorial tool. If you would like to find out more, please leave a comment below.

Why not also tell me what tutorial tools you are using and why?

I can’t thank @alexgspiers enough for inviting me to be part of the (crazy) facilitators team for #BYOD4L, what a team: @debbaff, @neilwithnell and @sheilmcn without whom this blog would still be waiting to be written!

Eek . . thank you for reading 🙂 I still have the fear!!